>
Showing posts with label DIY. Show all posts

HOW TO MAKE A PEONY WREATH


Want to make a peony wreath for spring and summer? Inspired by my friends Kelsea, Loren, and Sara Kate, I set out to create my own peony wreath before my sister came to spend the night at my apartment. What's more welcoming than a fragrant wreath made with everyone's favorite flower? Nothing, that's what. Here's how to make your own: 


1. Gather your materials.
You'll need the following:
- Green chicken wire
- Green floral wire
- Wire cutters
- Wire clothing hanger
- Greenery of your choice (I used a combination of boxwood and plant stems)
- Flower of your choice (I went with hot pink and white peonies)


2. Bend your chicken wire into the shape of your choice. 
Secure with floral wire.


3. Cut a wire clothing hanger and weave the ends into your chicken wire.
Secure with floral wire. If you have a strong hook or nail, you may skip this step.


4. Arrange greenery into your chicken wire.
Longer stems can be woven through the wire. Smaller pieces should be secured with floral wire. This would be especially easy with garland during the holiday season.


5. Place your peonies.
This is the fun part! I wound up using one and a half dozen blooms but you can adjust depending on your color scheme, whether you prefer an organic or structured look, etc. Secure with floral wire as necessary.


6. Hang and enjoy.
I almost wish I made this with artificial flowers so it would last forever but the smell is too good to resist. These wreaths would be perfect decor for a party or a wedding and definitely make a thoughtful touch for house guests. If you decide to make one, tag me on Instagram (@mackenziehoran #designdarling) so I can check it out! 


DIY LETTER WREATH

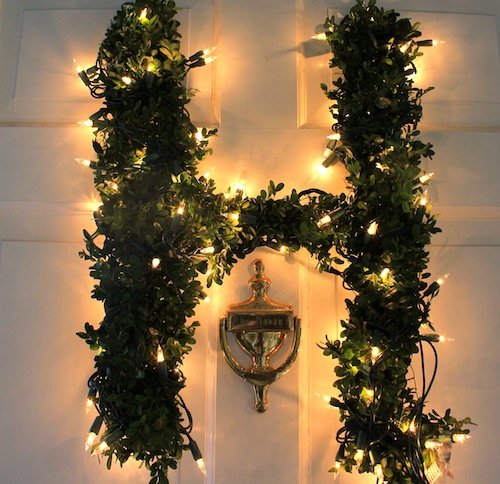
In the spirit of Monday's post about ten ways to decorate for Christmas, we got started this weekend placing candles in the windows and hanging garland over the front door. My mom had seen this adorable wreath and decided to recreate it with materials we had on hand. I love the way it turned out!
Materials: hand pliers, chicken wire, metal wire, and some sort of greenery (we used boxwood from our backyard but any kind of garland would do!).
1. Cut your chicken wire and lay out your shape. We did "H" for our last name but you could make any shape you like or even three letters for a monogram!
2. Twist each piece of chicken wire into a tube shape. This doesn't need to be perfect — just three-dimensional so you can secure your greenery to the wire.
3. Wrap your greenery around each part of the letter and secure with metal twist ties as needed.
5. Go back and trim as necessary. 
6. Ta da! You're almost finished. Now wrap with Christmas lights...
7. And hang on your front door! You'll be the envy of the neighborhood. ;)
What do you think?! Any fun holiday DIY projects you've tackled lately? 

Keep up with Design Darling


DIY {Campaign Table}

I'm a little bit obsessed with campaign furniture. You may recall my dad and I painted this Union Jack campaign dresser for my boyfriend. Then I purchased a second dresser off of Craigslist and gave it new life with glossy white paint for my own bedroom. Then last week I decided it would be pretty cool get the look of campaign furniture without having to stalk my local Craigslist or spending hundreds of dollars. Without further ado, my DIY campaign table!

I started with two of these Ikea Lack tables ($10 each) and gave each two coats of Benjamin Moore's semi-gloss Admiral Blue. 
Then I bought brass corner braces like these ($1.50 for four). You'll need three braces per corner so three packs per table. (Math isn't my strong suit so I thought I'd spell that out for you.)
My intention was to screw three to each corner but after learning that I'm not so handy with heavy machinery my dad stepped in to show me the ropes.
Work in progress (sleeping companion strongly recommended)...
And the end result looks something like this.
One day I'll show you pretty pictures of them all styled up in my first apartment but until then you get iPhone pictures of me tackling DIY projects on my kitchen floor. The project cost boils down like this:

- $10 x 2 for two Ikea Lack tables = $20
- Leftover paint = free
- $1.50 x 6 for twenty-four brass corner braces = $9

$29 for two DIY campaign tables! What do you think?